Photography Studio and Lighting Forum

Hosted by fabulous Florida-based professional fashion photographer, Asylum Steve, this forum is for discussing studio photography and anything related to lighting.
Page 3 of 3 FirstFirst 123
Results 51 to 74 of 74
  1. #51
    Junior Member
    Join Date
    Dec 2009
    Location
    PA
    Posts
    34

    Re: Novice lighting help

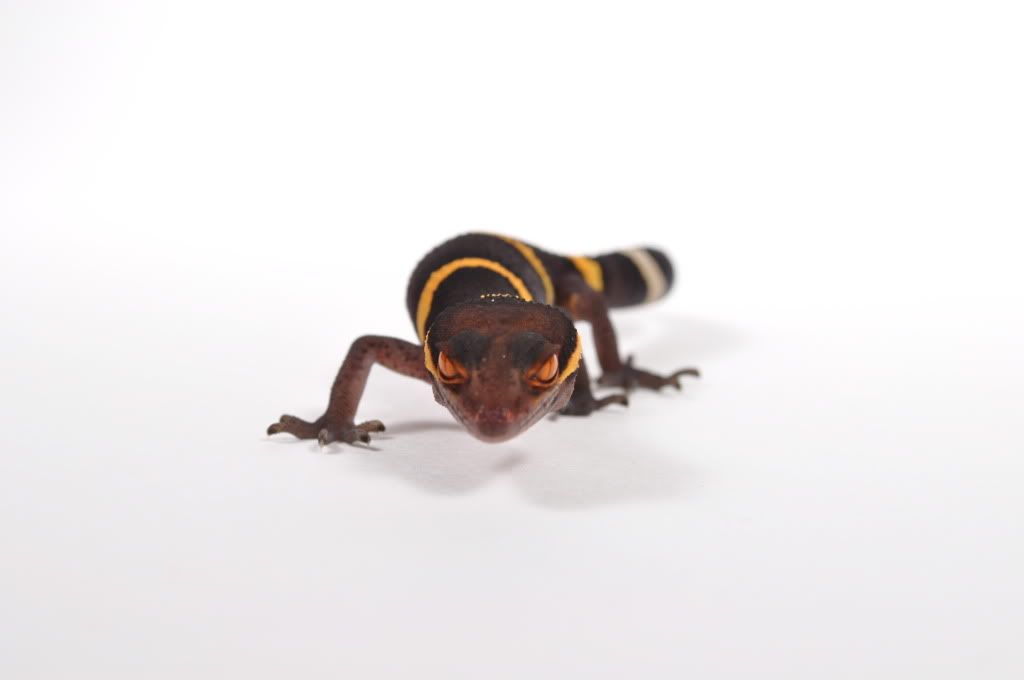
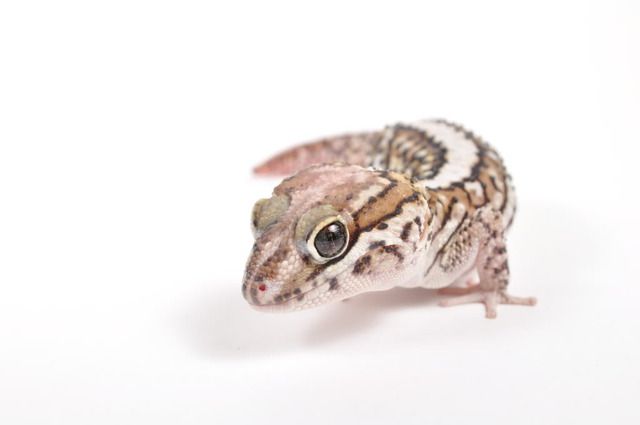
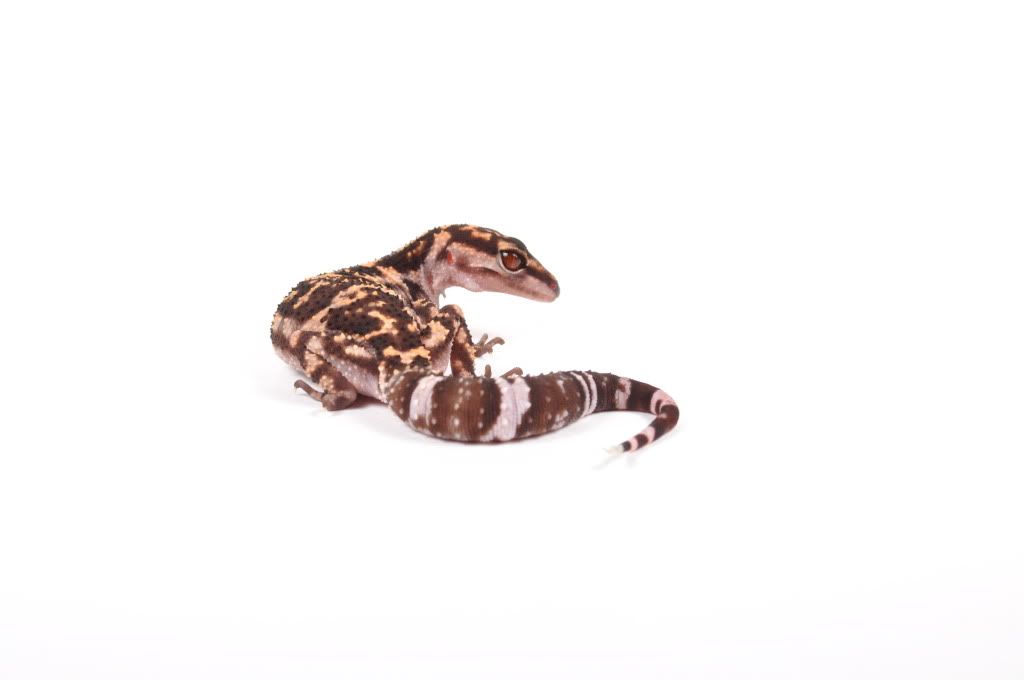
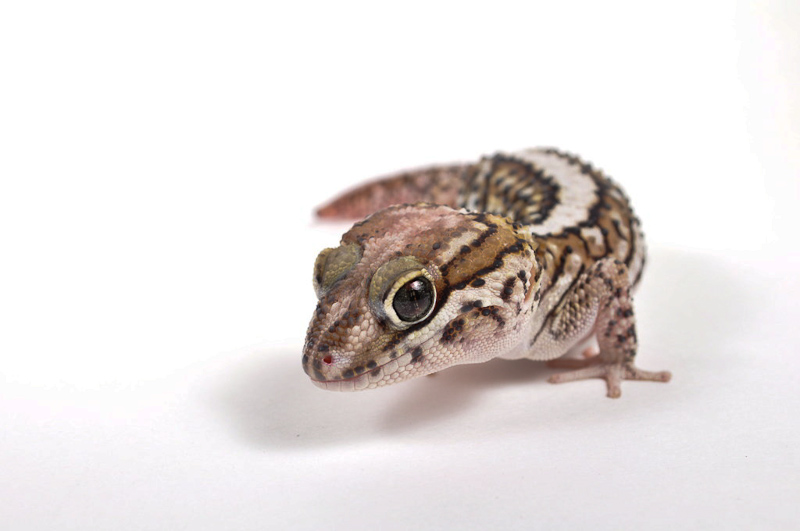
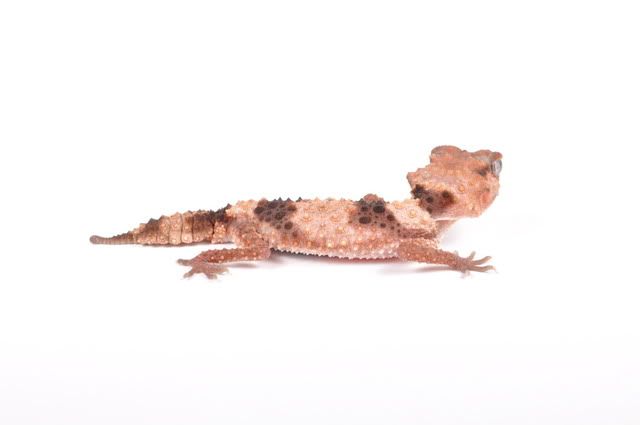
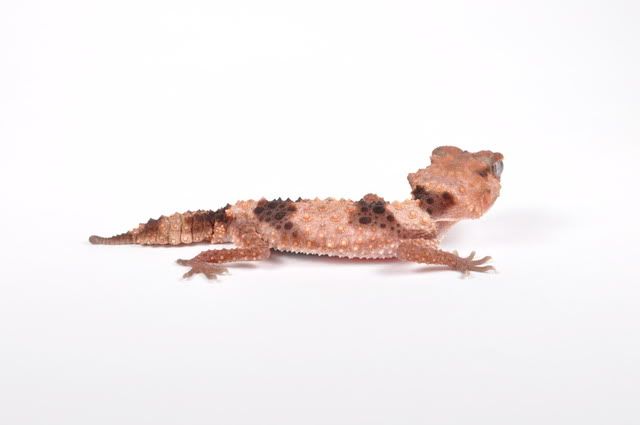
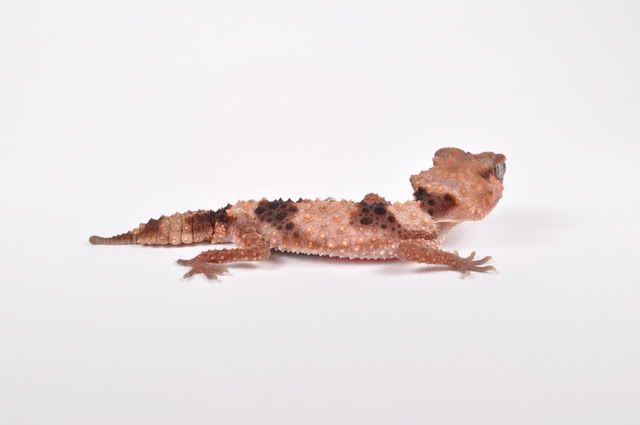
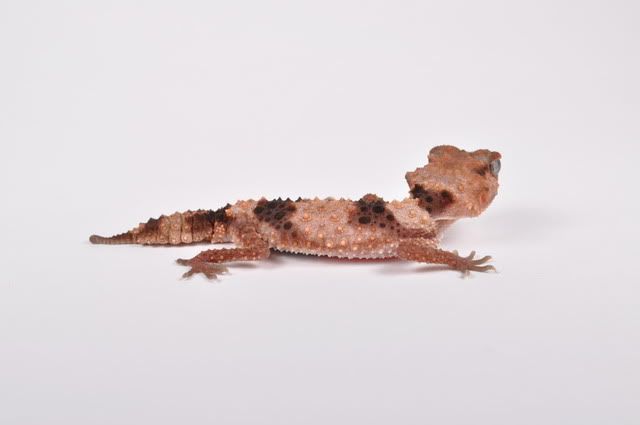
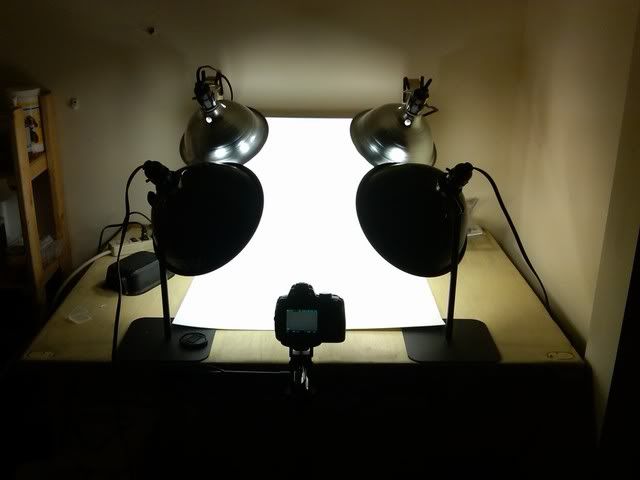
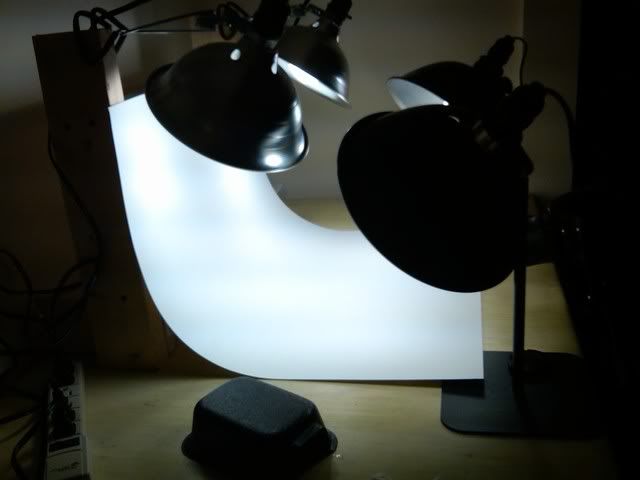
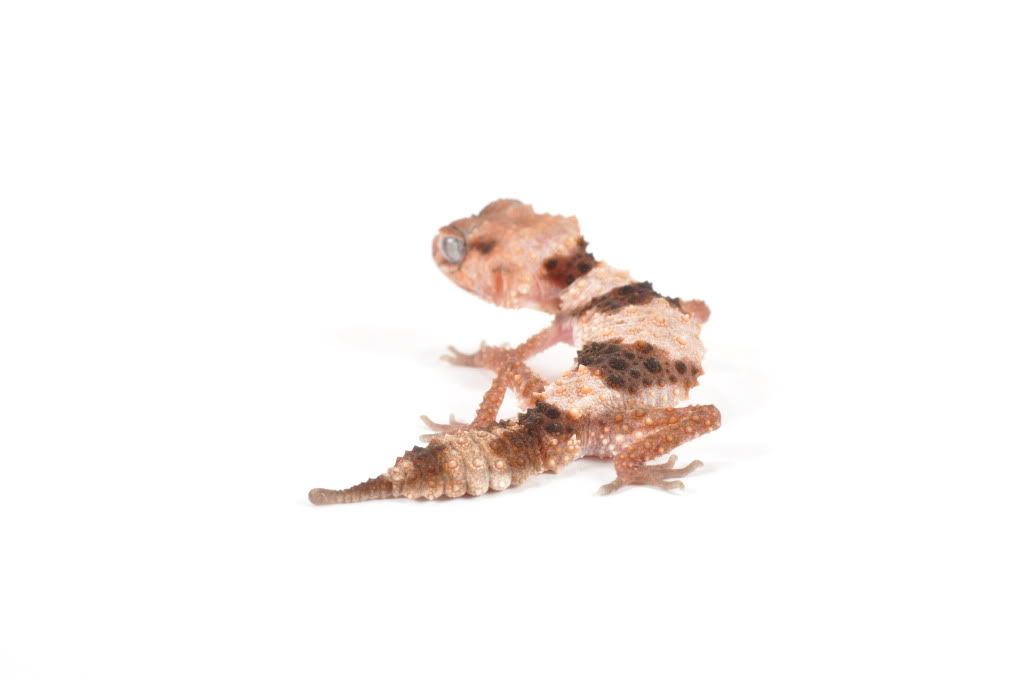
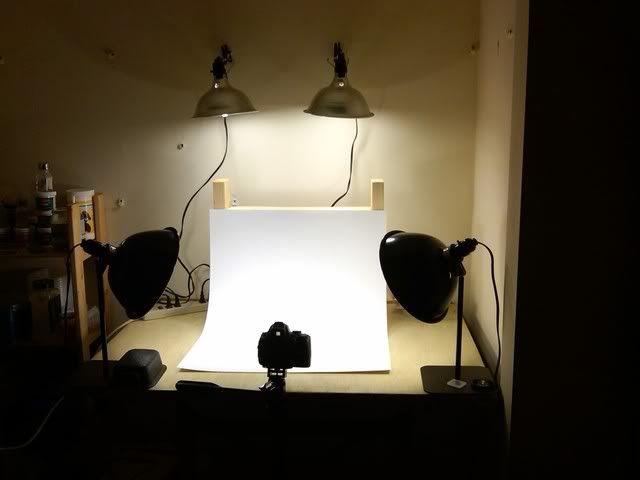
    I actually was back pretty far, like I said I cropped all of those shots, here is a shot before post processing just to show you what I mean, these were with my 18-55 on and fully zoomed in :


    You think I need to back up farther than this? btw is the blur from being slightly out of focus or is it from the aperture depth? It it a bad idea to allow my camera to auto focus for me? This gecko was very well behaved and sat almost perfectly still for me, but the majority of the geckos im going to have a heck of a time getting them to sit still long enough to focus the lens manually

  2. #52
    Senior Member jetrim's Avatar
    Join Date
    Jul 2008
    Location
    Ft. Lauderdale
    Posts
    3,229

    Re: Novice lighting help

    Auto focus is fine, just make sure you aim it for the eyes. If you're running out of room, you can do a couple of other things
    1. double the ISO and you can half the aperture f/5.6 @ 100 ISO = f/8 @ 200 ISO = f/11 @ 400 ISO for the same shutter speed.

    2. Pretty sure you have the ability to set EV (Exposure value) on your camera. Go down 1 full stop in aperture (f/5.6>f/8) and set the camera for +1 EV or two if needed (f/5.6>f/11) +2 EV

    Either way should work just fine. ISO 100 generally gives the clearest image, but you aren't blowing these up to 24"x36" posters so the difference in web optimized resized images is going to be negligible well up past 800 ISO on your camera.

    Ohh, and the blur is from the tight depth of field - it happens, nothing to worry about.

  3. #53
    Junior Member
    Join Date
    Dec 2009
    Location
    PA
    Posts
    34

    Re: Novice lighting help

    Quote Originally Posted by jetrim
    Auto focus is fine, just make sure you aim it for the eyes. If you're running out of room, you can do a couple of other things
    1. double the ISO and you can half the aperture f/5.6 @ 100 ISO = f/8 @ 200 ISO = f/11 @ 400 ISO for the same shutter speed.

    2. Pretty sure you have the ability to set EV (Exposure value) on your camera. Go down 1 full stop in aperture (f/5.6>f/8) and set the camera for +1 EV or two if needed (f/5.6>f/11) +2 EV

    Either way should work just fine. ISO 100 generally gives the clearest image, but you aren't blowing these up to 24"x36" posters so the difference in web optimized resized images is going to be negligible well up past 800 ISO on your camera.

    Ohh, and the blur is from the tight depth of field - it happens, nothing to worry about.

    Sorry to keep asking questions but apparently i am totally missing a major part of photography knowledge here. How did you figure out f8 is half of f5.6 and that f11 is half of f8? Also im confused by the (f5.6>f8) part and (f5.6>f11)

    Yes my camera does allow me to change the exposure. I can set to change it in what ever incriments I want to if I remember correctly from what I read in my manual. Its currently set up to go in increments of 3rds though 1/3,2/3,1,1 1/3 ect.... I think I can go the whole way out to +5

  4. #54
    Senior Member OldClicker's Avatar
    Join Date
    Aug 2008
    Location
    Mundelein, IL USA
    Posts
    4,075

    Re: Novice lighting help

    Quote Originally Posted by trizzypballr
    Sorry to keep asking questions but apparently i am totally missing a major part of photography knowledge here. How did you figure out f8 is half of f5.6 and that f11 is half of f8? Also im confused by the (f5.6>f8) part and (f5.6>f11)
    How about from the #26 post on the first page of this thread.

    "- Aperture - The aperture is the hole in the lens. The wider the aperture (lower the f/stop) the more light. The common stops are 2.8, 4, 5.6, 8, 11, and 22. Going down 1 stop is twice as much light."

    There is no magic setting. Go back and read (re-read I hope) that post and learn the three ways to increase and decrease the exposure and by how much.

    TF
    -----------------
    I am no better than you. I critique to teach myself to see.
    -----------------
    Feel free to edit my photos or do anything else that will help me learn.
    -----------------
    Sony/Minolta - way more gear than talent.

  5. #55
    Senior Member jetrim's Avatar
    Join Date
    Jul 2008
    Location
    Ft. Lauderdale
    Posts
    3,229

    Re: Novice lighting help

    Old Clicker had given a pretty good explanation on the bottom of the first page, but if you want to know why... All full stops are doubles of the stop below starting from 1 & 1.4

    f/1____2____4____8____16____32____64
    f/__1.4__2.8___5.6___11___22____45____90

    It isn't anything new for the digital age, these values were established in the 1800's

  6. #56
    Junior Member
    Join Date
    Dec 2009
    Location
    PA
    Posts
    34

    Re: Novice lighting help

    Quote Originally Posted by OldClicker
    How about from the #26 post on the first page of this thread.

    "- Aperture - The aperture is the hole in the lens. The wider the aperture (lower the f/stop) the more light. The common stops are 2.8, 4, 5.6, 8, 11, and 22. Going down 1 stop is twice as much light."

    There is no magic setting. Go back and read (re-read I hope) that post and learn the three ways to increase and decrease the exposure and by how much.

    TF
    I am sorry, I did read your post when you posted it. It was just that I was still trying to learn so much that I ended up pulling certain things from it (not on purpose of course) I had taken the mental note that ISO shutter speed and aperture all go together, if you adjust one you will have to adjust the others accordingly. I totally forgot about the fact that each stop down is double and that each ISO up is double.

    BTW the setting of f11 and 400 ISO worked great!

  7. #57
    Junior Member
    Join Date
    Dec 2009
    Location
    PA
    Posts
    34

    Re: Novice lighting help

    Quote Originally Posted by jetrim
    Auto focus is fine, just make sure you aim it for the eyes. If you're running out of room, you can do a couple of other things
    1. double the ISO and you can half the aperture f/5.6 @ 100 ISO = f/8 @ 200 ISO = f/11 @ 400 ISO for the same shutter speed.

    Im still playing with this:-) Some pics are turning out nicely some are still slightly over exposed. After reading threw everything posted in the thread a third time if im shooting at f/11,400 ISO and a shutter speed of 1/40 and the images seem to be washed out maybe I shout try the same aperture and ISO at maybe 1/60 shutter speed to allow slightly less light in? Hopefully Im thinking on the right track now:-) Btw here is a few examples I thought I would share :-)

    Here is my favorite so far, check out the evil mean look!


    Here is another I thought turned out well, do you think it might be a touch over exposed?


    Here is a third shot, one of the ones that I can tell you are over exposed for sure, her colors are off, her brown is much darker in real life

  8. #58
    Senior Member OldClicker's Avatar
    Join Date
    Aug 2008
    Location
    Mundelein, IL USA
    Posts
    4,075

    Re: Novice lighting help

    I thhink you're getting it. These look good. I think you could try 1/60 sec or even faster. Here is about -1 stop exposure and more contrast. - TF


    Novice lighting help-dsc_0133.jpg
    -----------------
    I am no better than you. I critique to teach myself to see.
    -----------------
    Feel free to edit my photos or do anything else that will help me learn.
    -----------------
    Sony/Minolta - way more gear than talent.

  9. #59
    Junior Member
    Join Date
    Dec 2009
    Location
    PA
    Posts
    34

    Re: Novice lighting help

    Ok here are a few more shots. The pose wasnt the greatest, but I wanted to get his colors on his back so that it would be easiest to compare him to his true colors that way.

    Here is 1/40 shutter speed:


    Here is 1/50 shutter speed:


    Here is 1/60 shutter speed:


    Here is 1/80 shutter speed:


    Now my main problem is that the last shot of 1/80 shutter speed is the most accurate to his actual colors, but as you can see I totally lost my white background. My shots at higher shutter speeds were down around 3,2,2,0 CMYK the 1/80 where is color is the most accurate the backgrounds are up somewhere around 12,10,8,0 CMYK which is WAY darker than I want my background to be.

    Now if I learned correctly from what OldClicker told me about shutter speed/aperture/ISO is that I need to play with them until my image is correctly exposed, which would be my 1/80 image since thats the picture that matches my shot closest to real life colors correct? So if im understanding everything correctly now my ONLY option is to add more lighting to make the background whiter? Once I do that will I need to change my camera setting again or should I be good right where im at then?

  10. #60
    Junior Member
    Join Date
    Dec 2009
    Location
    PA
    Posts
    34

    Re: Novice lighting help

    Oh wow, once I shrank them down to a smaller size to post on here, there looks like there is almost no difference in his colors between pictures does there?

  11. #61
    Senior Member OldClicker's Avatar
    Join Date
    Aug 2008
    Location
    Mundelein, IL USA
    Posts
    4,075

    Re: Novice lighting help

    The color difference between the first and last is significant.

    Try a brighter, shinier white background. That should give it more apparent exposure compared to the subject.

    TF
    -----------------
    I am no better than you. I critique to teach myself to see.
    -----------------
    Feel free to edit my photos or do anything else that will help me learn.
    -----------------
    Sony/Minolta - way more gear than talent.

  12. #62
    Junior Member
    Join Date
    Dec 2009
    Location
    PA
    Posts
    34

    Re: Novice lighting help

    ok, Ill see if I can find a large sheet of glossy paper then. I was taking the pictures on a uncoated sheet of paper

  13. #63
    Senior Member jetrim's Avatar
    Join Date
    Jul 2008
    Location
    Ft. Lauderdale
    Posts
    3,229

    Re: Novice lighting help

    The glossier paper will help (might try waxed freezer paper as a cheap easy experiment) but you could also try shaping the light more. If you want the background brighter than it is at 1/80th try moving the background light a bit further away (sounds backward but it works) and then using a piece of black foam core or posterboard to keep the background light from spilling on to the subject. The idea is to get the background to "blow out" while keeping the subject at a proper exposure. Beyond that, it may require a further investment in equipment or some post processing work to the bakground.

  14. #64
    Junior Member
    Join Date
    Dec 2009
    Location
    PA
    Posts
    34

    Re: Novice lighting help

    Apparently no where around here carries nice big sheets of glossy paper! I checked walmart, a local arts and crafts store, Staples. Everywhere has the dull looking thick sheets of poster board that im using now, but nothing glossy that size. i thought the thicker poster board might work because its shinier and glossy, but its not bendable so I would end up with creases in the back ground. Ill see if I have some wax paper around to give a shot. As far as the shaping the light idea, do you happen to have or know where i can find a picture to see exactly what your explaining. Im not quite understanding. Your pretty much saying to suspend a piece of poster board at like a 45 degree angle pointing towards the background but stop it high enough so its out of the picture?
    The nice thing is once I actually figure out what im doing as far as what i need im going to set up a table just for taking shots. I have a bunch of scrap 2x4 around ill use to make some kind of makeshift setup so that everything will stay in place for me to make my life alot easier

  15. #65
    Junior Member
    Join Date
    Dec 2009
    Location
    PA
    Posts
    34

    Re: Novice lighting help

    I love how you go to the store and buy a pack of compact fluorescent bulbs that are labeled bright white, bring them home and use them, they are no where near bright white! I have the 2 "bright white" bulbs that came with the tent kit I purchased that actually are white. They are what I have been using for the pics ive been posting recently. Now since I lowered my shutter speed and need more light, I need 4 bulbs total, no big deal I go and buy 4 new bulbs. I messed up and bought 6500k daylight bulbs which are bluish. Even with the white balance set the pics still have a bluish tint. Once again no big deal ill go back and buy 4 more bulbs of the right kelvin temperature. So I find these bulbs labeled bright white, they even have a little scale drawn on the package with the arrow right in the center pointing at the bright white part of the color spectrum. As soon as I turned the bulbs on I could tell they were no where near white at all. To make it even worse now I cant manually set my white balance because apparently there is to much light making everything to bright now, I get an error message every time I try. I took 2 quick photos of my 'ghetto setup' maybe thats where Im so far off. Keep in mind in my old shots I was posting, if you just remove the 2 top lights, that was exactly how I was taking those shots.


  16. #66
    Junior Member
    Join Date
    Dec 2009
    Location
    PA
    Posts
    34

    Re: Novice lighting help

    Quote Originally Posted by jetrim
    The glossier paper will help (might try waxed freezer paper as a cheap easy experiment) but you could also try shaping the light more. If you want the background brighter than it is at 1/80th try moving the background light a bit further away (sounds backward but it works) and then using a piece of black foam core or posterboard to keep the background light from spilling on to the subject. The idea is to get the background to "blow out" while keeping the subject at a proper exposure. Beyond that, it may require a further investment in equipment or some post processing work to the bakground.

    I also wanted to note that I wasnt ignoring you about the back light thing. It was that because I only had 2 good quality bulbs I was aiming them alittle higher than the gecko so that the majority of the light would hit the backdrop, but there would still be some light hitting the gecko. I have a feeling your going to suggest backing all of the lights away from the object more?


    EDIT: Also I just thought about it now that I have that many lights, maybe I could give the light tent a shot again. I strayed away from it before because I couldnt get enough light into it. Now with all of this light I should be able to though

  17. #67
    Junior Member
    Join Date
    Dec 2009
    Location
    PA
    Posts
    34

    Re: Novice lighting help

    Great news guys, I moved the lights alittle farther away and boom! the background was literly perfect every spot i checked came out as 0,0,0,0! His face was alittle out of focus but no biggie i was trying to get his color down which I think I also accomplished with this picture. Heres the shot:


    Here is a new shot of how far away the lights were to get the shot I got:


    Its hard to see the top lights in this shot, but its as far back as i could get, the tables actually setup in what used to be a closet :-p

  18. #68
    Junior Member
    Join Date
    Dec 2009
    Location
    PA
    Posts
    34

    Re: Novice lighting help

    Well now I came up with a totally new issue with a certain kind of gecko that I breed, the leopard gecko. I knew all geckos didnt care for light, but apparently they guys hate it. They freek out as soon as i put them down to try to take a picture. It is impossible to get a picture that way. I tried using the cameras flash to help, but the results were horrible. Does this mean I will have to resort to some kind of external flash like the alien bees model I talked about earlier in the thread?

  19. #69
    mod squad gahspidy's Avatar
    Join Date
    Feb 2004
    Location
    N.Y. U.S.A.
    Posts
    8,368

    Re: Novice lighting help

    Quote Originally Posted by trizzypballr
    Well now I came up with a totally new issue with a certain kind of gecko that I breed, the leopard gecko. I knew all geckos didnt care for light, but apparently they guys hate it. They freek out as soon as i put them down to try to take a picture. It is impossible to get a picture that way. I tried using the cameras flash to help, but the results were horrible. Does this mean I will have to resort to some kind of external flash like the alien bees model I talked about earlier in the thread?
    You certainly do not need to buy studio heads for shooting these small subjects.
    You can purchase two Hot shoe flashes that have manual controls, trip them with your cameras flash via optical slaves and have them shooting into two bounce/shoot through umbrellas mounted on a couple of light stands. All for less about 300.00 (the cost of 1 alien bee with no other needed accessories)
    BTW, I shoot with portable hot-shoe strobes and love their versatility. I have two Canon 580EXll speedlites and the Vivitar 285HV. All you need are two of the Vivitars shooting into umbrellas.
    The lightstands, umbrellas that I linked to are all very inexpensive but will certainly do the trick. You could always substitute more expensive and robust equipment if you were so inclined and money was no issue.

    Here are the links:

    http://www.adorama.com/VV285HV.html?...=vivitar+285HV
    2 Vivitar 285 HV hot shoe flash with manual controls

    http://www.adorama.com/WNPN1.html?se...n+peanut+slave
    2 optical slaves from Wein (peanuts slaves that plug right into your Vivitar 285HV)

    www.adorama.com/LTU33BC.html
    2 umbrellas that can be bounced or used as shoot-thru

    http://www.adorama.com/LTUSH.html
    2 universal swivel holder for mounting the flash and the umbrella to your lightstand

    www.adorama.com/LTSB3.html
    2 lightstands


    OR

    For 299.00 you can get a whole kit that uses budget strobes and umbrella, softbox, and is able to be triggered by the flash of your camer as well.
    http://www.adorama.com/PAINT182.html
    please do not edit and repost my photos


    gary


  20. #70
    Senior Member
    Join Date
    Jun 2006
    Location
    Chicago, IL
    Posts
    1,094

    Re: Novice lighting help

    I think you should get some flashes like the ones in the links above. Two should do it, but it will set you back hundreds of dollars.

    Here's why:

    You're shooting nocturnal ectotherms, specifically geckos.

    You know that they don't like light. You know that they get fast and flighty when they get too warm. They don't like to bask. They don't like to be out in the open. They spend most of their time hiding beneath things, in the dark. Putting them out in the open in a ton of hot light is not going to make them happy.

    With strobes, you will only need enough light to see what you are doing. They fire for a fraction of a second so they won't add heat to the scenario. You will be able to shoot in normal room lighting, more or less, which will make the geckos much more comfortable. You will be able to stop down to f/22 if you want, to get more depth of field. The strobes will be more than powerful enough to compensate. The exposure will be faster than 1/100s so you won't get any motion blur. You will be able to remove the camera from the tripod (if you want) for different angles, and you won't have to worry about camera shake because the exposure is so fast. You also won't get such small pupils because the ambient light level is so much lower. Big pupils = cute.

    From a technical standpoint, it will make your life very easy.

    I'd also suggest getting a no-exit hide like a flower-pot saucer, so you can put the gecko under it and walk away for five minutes to let it calm down. The smaller, the better. And make sure to shoot them at night, when they are "colored up."

    I had a heck of a time with your exact setup, shooting leopards, fat tails, and even diurnal snakes. the amount of light and the extra heat made it miserable. They wouldn't hold still for three seconds. And it's nearly impossible to shoot reptiles in sunlight - they just get too warm and nervous.
    Erik Williams

    Olympus E3, E510
    12-60 SWD, 50-200 SWD, 50 f/2 macro, EX25, FL36's and an FL50r.

  21. #71
    Senior Member
    Join Date
    Jun 2006
    Location
    Chicago, IL
    Posts
    1,094

    Re: Novice lighting help

    You might be able to get away with one strobe, if you can fire the onboard flash and the strobe wirelessly. I was curious about how down and dirty cheap this could be set up - so I got out some scotch tape, a pad of off-white drawing paper, and a flower pot saucer. These were essentially free because it's just junk from around the house. I taped the paper to the wall. It needed an extra sheet beneath it to make it more opaque, the dresser's dark brown showed through pretty easily. I propped the rest of the pad against the bookcase to bounce light back onto the scene. I have a real honest-to-god reflector around here somewhere, but it didn't make any difference in this situation. I think I paid about $100 total for my umbrellas and stands. I have two of each, so expect to spend $50. It's worth it. The flash could be any wireless hotshoe flash.

    The camera, lens, and flash set me back $2000, but there's no reason you shouldn't be able to get great results with your kit.


    I shot full manual, setting the F/stop to get enough depth of field. I arbitrarily set the shutter speed fast enough to get rid of the ambient light - even though I was using flash, I wanted to make sure the lights in the room didn't effect the color in funny ways. Best to use %100 of the same light temperature in a photo like this. Without the flash, the shot would have been totally black. I also fired the onboard flash for fill light. I think a little fiddling with the reflector side would lighten those floor shadows.

    This took five minutes to set up. I spent three minutes wrangling and shooting. I've spent about ten times that much time just typing this up

    I did some post processing, but this is what the gecko looks like. I adjusted curves, levels, cropped, sharpened, and converted from aRGB to sRGB. I know she's no beauty queen, but she'll sit still better than most.

    Erik Williams

    Olympus E3, E510
    12-60 SWD, 50-200 SWD, 50 f/2 macro, EX25, FL36's and an FL50r.

  22. #72
    mod squad gahspidy's Avatar
    Join Date
    Feb 2004
    Location
    N.Y. U.S.A.
    Posts
    8,368

    Re: Novice lighting help

    Great results, and wonderful example, Eric.
    He can have this set up with one flash and lightstand/umbrella for about 150.00 and be done with it.
    please do not edit and repost my photos


    gary


  23. #73
    Member
    Join Date
    Oct 2008
    Location
    va
    Posts
    430

    Re: Novice lighting help

    Quote Originally Posted by trizzypballr
    Well now I came up with a totally new issue with a certain kind of gecko that I breed, the leopard gecko. I knew all geckos didnt care for light, but apparently they guys hate it. They freek out as soon as i put them down to try to take a picture. It is impossible to get a picture that way. I tried using the cameras flash to help, but the results were horrible. Does this mean I will have to resort to some kind of external flash like the alien bees model I talked about earlier in the thread?
    May I suggest using manual focus. Prefocus (maybe using a fork or box of cigarettes, etc), lightly mark the area that's in focus with a pencil (this is where the gecko's head will go), set the gecko down in the appropriate spot and quickly snap the photo. This will save you a lot of time vs. putting the gecko down and then trying to focus on it.

  24. #74
    Senior Member
    Join Date
    Jun 2006
    Location
    Chicago, IL
    Posts
    1,094

    Re: Novice lighting help

    Also, the easiest way to get a white background is to shoot for a properly exposed gecko, then use the magic wand to create a copy of the gecko in another layer. Use levels to blast the background whites up to white and edit the gecko seperately. It's down and dirty too, but it works fine. Make sure the floor shadows stay on the background and aren't included in the gecko layer, or they may posterize badly.

    Good luck with predicting focus. I usually go AF and keep shooting. The problem isn't getting it in focus, it's getting a good pose.
    Erik Williams

    Olympus E3, E510
    12-60 SWD, 50-200 SWD, 50 f/2 macro, EX25, FL36's and an FL50r.

Page 3 of 3 FirstFirst 123

Thread Information

Users Browsing this Thread

There are currently 2 users browsing this thread. (0 members and 2 guests)

Posting Permissions

  • You may not post new threads
  • You may not post replies
  • You may not post attachments
  • You may not edit your posts
  •